Contents
- Streaming Download
- Streaming-Cloner Software
- What are the meanings of "Amazon Prime Video, Netflix, Disney Plus, HBO Max, AZ, NF, DP, HM"?
- What is Streaming-Cloner?
- What videos can Streaming-Cloner download?
- What are the technical advantages of Streaming-Cloner?
- Can I run Streaming-Cloner on a 32-bit operating system?
- Can the video file downloaded by Streaming-Cloner be the MKV format?
- Does Streaming-Cloner support downloading 5.1 audio tracks?
- Does Streaming-Cloner support GPU acceleration when transcoding?
- How does Streaming-Cloner output smaller downloaded files?
- How to download online movie to DVD?
- Streaming-Cloner Ultimate
- What is Streaming-Cloner Ultimate?
- What's the difference between the Ultimate version and other standalone downloaders?
- How to purchase a license of Streaming-Cloner Ultimate?
- How to download, install and register Streaming-Cloner Ultimate?
- How to use Streaming-Cloner Ultimate?
- Why is buying the Ultimate version a good choice?
- Why do I get the window below? What does it mean?
- Netflix Movies and TV Series of Streaming Videos
- Batch Download Popular Netflix Series "God's Favorite Idiot" in MP4 (HD 1080p)
- How to full download the 2022 Netflix Movie "The Wrath of God" with your desired audio and subtitles?
- What is the best way to burn Netflix Streaming Video (Stranger Things Season 1-4) to DVD/Blu-ray?
- How to download Netflix movie "Apollo 10½: A Space Age Childhood" in MP4/MKV format?
- How to download Netflix movie "Senior Year" in MP4/MKV format?
- How to download Netflix TV series "Anatomy of a Scandal" in MP4/MKV format?
- How to download Netflix TV series "Grace and Frankie: Season 7" in MP4/MKV format?
- How to download Netflix TV series "Heartstopper" in MP4/MKV format?
- How to download Netflix TV series "The Lincoln Lawyer" in MP4/MKV format?
- How to download Netflix TV series "Ozark" in MP4/MKV format?
- How to download Netflix TV series "Meltdown: Three Mile Island" in MP4/MKV format?
- How to download Netflix movie "The Adam Project" in MP4/MKV format?
- How to download "Dolemite Is My Name" co-starring Chris Rock on Netflix?
- How to download nominees of 2022 Grammy® Awards Best Music Film "Bo Burnham: Inside" on Netflix?
- The Best Way to Download 10 Most-Recommended Movies/TV Shows 2021
- How to download Netflix original series Archive 81 in MP4/MKV format?
- How to download Netflix original series Squid Game in MP4/MKV format?
- How to download Netflix original series Love, Death & Robots: Season 2 in MP4/MKV format?
- How to download Netflix movie The Lost Daughter in MP4 format?
- How to download Netflix original movie The Power of the Dog?
- How to download Netflix original movie tick, tick...BOOM!?
- How to download Netflix original movie Red Notice?
- How to download Netflix original series Arcane?
- How to download Netflix original series Cowboy Bebop?
- How to download Netflix original series The Witcher: Season 2?
- How to download Netflix original movie Don't Look Up in MP4 format?
- The Best Christmas Movies on Netflix to Stream in 2021
- Two Ways to Download Netflix Movies and Shows
- How to Upload Netflix Videos to Google Drive?
- How to Watch Foreign Videos Offline on Netflix without VPN?
- How to Watch Netflix Movies and TV shows on Apple TV?
- How to Watch Netflix on Different Devices?
- How to Watch Netflix Videos on Non-smart TV?
- Amazon Prime Video Movies and TV Series of Streaming Videos
- Best Amazon Prime Video Downloader for The Series "The Summer I Turned Pretty".
- How to save the Amazon Prime Video series "The Old Man" forever?
- What is the best way to save Amazon Prime Video mini series "Dark Winds" and share with friends?
- How to download Amazon Prime Video movie "Morbius" in MP4/MKV format?
- How to download Amazon Prime Video movie "The Bad Guys" in MP4/MKV format?
- How to download Paramount+ movie "The Lost City" on Amazon Prime Video?
- How to download Amazon Prime Video movie "The Northman" in MP4/MKV format?
- How to download Amazon Prime Video original series "Outer Range" in MP4/MKV format?
- How to download Amazon Prime Video original series "This Is Us: Season 6" in MP4/MKV format?
- How to download Paramount+ TV series "The Offer" on Amazon Prime Video?
- How to download Paramount+ TV series "Star Trek: Strange New Worlds" on Amazon Prime Video?
- How to download Amazon Prime Video movie "Uncharted" in MP4/MKV format?
- How to download Amazon Prime Video movie "The Outfit" in MP4/MKV format?
- How to download "The Pursuit of Happyness" starring Will Smith on Amazon Prime Video?
- How to download "Men in Black" film series starring Will Smith on Amazon Prime Video?
- How to download "Independence Day" starring Will Smith on Amazon Prime Video?
- How to download "I Am Legend" starring Will Smith on Amazon Prime Video?
- How to download "The One and Only Dick Gregory" co-starring Chris Rock on Amazon Prime Video?
- How to download "Spiral: From the Book of Saw" starring Chris Rock on Amazon Prime Video?
- How to download "Madagascar" animated film series voiced by Chris Rock on Amazon Prime Video?
- How to download "Chris Rock: Kill the Messenger" on Amazon Prime Video?
- How to download "Good Hair" starring Chris Rock on Amazon Prime Video?
- How to download "Enemy of the State" starring Will Smith?
- How to download nominees of 2022 Grammy® Awards Best Music Film "Music, Money, Madness... Jimi Hendrix in Maui" on Amazon Prime Video?
- How to download nominees of 2022 Grammy® Awards Best Music Film "David Byrne's American Utopia" on Amazon Prime Video?
- How to download nominees of 2022 Grammy® Awards Best Music Film "Summer of Soul" on Amazon Prime Video?
- How to download series "Halo" on Amazon Prime Video?
- The Best Way to Download 10 Nominees of Best Picture for 94th Academy Awards.
- How to download nominees of Academy Awards Best Picture "Belfast" on Amazon Prime Video?
- How to download nominees of Academy Awards Best Picture "Drive My Car" on Amazon Prime Video?
- How to download nominees of Academy Awards Best Picture "King Richard" on Amazon Prime Video?
- How to download nominees of Academy Awards Best Picture "Licorice Pizza" on Amazon Prime Video?
- How to download nominees of Academy Awards Best Picture "Nightmare Alley" on Amazon Prime Video?
- How to download 94th Academy Awards Best Picture Winner "CODA"? [Edited on March 31, 2022]
- How to download Amazon Prime Video movie The Tomorrow War in MP4/MKV format?
- How to download Amazon Prime Video movie Eternals in MP4/MKV format?
- How to download Amazon Prime Video movie Sing 2 in MP4/MKV format?
- How to download Amazon Prime Video movie Ghostbusters: Afterlife in MP4 format?
- How to download Amazon Prime Video original series The Wheel of Time?
- How to download Amazon Prime Video movie Shang-Chi and the Legend of the Ten Rings?
- How to download Amazon Prime Video movie Dune?
- How to download Amazon Prime Video movie No Time To Die?
- How to download Amazon Prime Video original series The Expanse: Season 6?
- How to download Amazon Prime Video movie Resident Evil: Welcome to Raccoon City?
- How to download series 1883 Episode 1 on Amazon Prime Video in MP4 format?
- Best Two Ways to Share Amazon Prime Video
- Guide: Watch Amazon Prime Video Offline without the App
- How to Watch Amazon Prime Video Offline?
- Disney Plus Movies and TV Series of Streaming Videos
- Best Disney Plus Video Downloader for "Hollywood Stargirl".
- How to download Disney Plus original TV series "The Quest" in MP4/MKV format?
- How to download Disney Plus original movie "Sneakerella" in MP4/MKV format?
- How to download Disney Plus TV series "Parallels" in MP4/MKV format?
- How to download Disney Plus movie "Turning Red" in MP4/MKV format?
- How to download Disney Plus movie "Better Nate Than Ever" in MP4/MKV format?
- How to download Disney Plus original movie "Aladdin" starring Will Smith?
- How to download nominees of 2022 Grammy® Awards Best New Artist Olivia Rodrigo's "Driving Home 2 U" documentary on Disney Plus?
- How to download nominees of 2022 Grammy® Awards Best Music Film "Happier Than Ever" on Disney Plus?
- How to download Disney Plus original series "Moon Knight"?
- How to download nominees of Academy Awards Best Picture "West Side Story" on Disney Plus?
- How to download Disney Plus movie The-ice-age-adventures-of-buck-wild in MP4/MKV format?
- How to download Disney Plus movie Junior-alices-wonderland-bakery in MP4/MKV format?
- HBO Max Movies and TV Series of Streaming Videos
- What is the best way to download Westworld Season 4 Episode 1 in MP4 HD 1080p and burn all the 4 seasons to DVD/Blu-ray?
- Full Download HBO Max Movie "Father of the Bride" in MP4 (HD 1080p).
- How to download HBO Max original movie "Spring Awakening: Those You've Known" in MP4 format?
- How to download HBO Max original series "Hacks: Season 2" in MP4 format?
- How to download HBO Max original series "The Staircase" in MP4 format?
- How to download HBO Max original series "The Time Traveler's Wife" in MP4 format?
- How to download HBO Max original series "Tokyo Vice" in MP4 format?
- How to download HBO Max original series "We Own This City" in MP4 format?
- How to download HBO Max movie "The Survivor" in MP4 format?
- How to download HBO Max movie "The King's Man" in MP4 format?
- How to download HBO Max movie "The Batman" in MP4 format?
- How to download HBO Max series Peacemaker in MP4 format?
- How to download HBO Max series Barry in MP4 format?
- Netflix Streaming Video Downloader
- How to Download Netflix Original Series?
- How to Download Netflix Video for Streaming Offline?
- How to Download Netflix Videos in MKV Format?
- How to Download Netflix Videos in MP4 Format?
- How to Download Movies from Netflix in HD Quality?
- How to Download Netflix Movies and TV Shows?
- How to Download Netflix TV Shows and Movies to PC?
- How to Save Netflix Videos on SD Card?
- How to Share Netflix Videos with Friends?
- How to Transfer Netflix Downloads between Devices?
- How to Transfer Movies from Netflix to USB Drive?
- How to Transfer Netflix Videos to External Hard Drive?
- How to download Netflix Movies and TV series[Video Guide]?
- Amazon Prime Video Streaming Video Downloader
- Best Amazon Prime Video Downloader Review
- How to Download Amazon Prime Video from the Web Browser?
- How to Download Amazon Prime Video in MP4 Format?
- How to Download Amazon Prime Video on Windows?
- How to Download Amazon Prime Video in MKV Format?
- How to Move Amazon Prime Videos to USB?
- How to Save Amazon Prime Video Forever?
- How to Save Amazon Prime Video in High Quality?
- Two Ways to Save Amazon Prime Video to SD Card
- Simple Way to Download Any Amazon Prime Video to PC
- Stream Amazon Prime Video with Amazon Prime Video Free Trial
- How to download Amazon Prime Video Movies and TV series[Video Guide]?
- Disney Plus Video Streaming Video Downloader
- HBO Max Streaming Downloader
- Streaming-Cloner Software
- How to use DVD-Cloner
- How to Copy/Rip the 94th Oscar-nominated Movies Released on 4K UHD Blu-ray/DVD by using DVD-Cloner Software?
- How to Copy/Rip "Belfast" on Blu-ray/DVD?
- How to Copy/Rip 94th Academy Awards Best Picture Winner "CODA" on Blu-ray/DVD? [Edited on March 31, 2022]
- How to Copy/Rip "Drive My Car" on Blu-ray/DVD?
- How to Copy/Rip "Dune" on 4K UHD Blu-ray/DVD?
- How to Copy/Rip "King Richard" on 4K UHD Blu-ray/DVD?
- How to Copy/Rip "Licorice Pizza" on Blu-ray/DVD?
- How to Copy/Rip "Nightmare Alley" on 4K UHD Blu-ray/DVD?
- How to Copy/Rip "West Side Story" on 4K UHD Blu-ray/DVD?
- Introduction of the Express Interface
- How to send the log file and IFO files?
- How to make a screenshot on your computer?
- How to find my Product ID on my computer?
- How to use key file on your computer?
- How to back up the DVD movie on the hard disk?
- How to find the "movie-only" copy mode?
- How to combine multiple DVDs to one BD-R/RE(DL) with the Expert interface?
- Combine several movie titles from two DVDs to one DVD+/-R DL.
- Combine several movie titles from multiple DVDs to one BD-R/RE.
- How to find the log file on my computer?
- Copy a Blu-ray movie disc to a blank BD-R/RE(DL) with DVD-Cloner Gold.
- Introduction of the Expert Interface
- When the source movie is DVD-5 or DVD-9
- When the source movie is BD-25 or BD-50
- How to copy a DVD movie to a DVD±R or to the hard disk with the expert interface?
- How to burn a DVD movie from the hard disk to a DVD±R with the Expert Interface?
- How to combine two DVD movies to one DVD+/-R DL with the Expert interface?
- System requirements
- How to copy Blu-ray movies?
- Copy a Blu-ray movie disc to an ISO file and burn it to a blank BD-R/RE(DL) with DVD-Cloner Gold.
- How to rip DVD to an MKV file?
- How to rip Blu-ray to an MKV file?
- How to rip UHD Blu-ray to an MKV file?
- How to convert DVD or Blu-ray to H.265 format?
- How can I improve the picture quality when ripping DVD to MKV?
- How to Rip DVD to a NAS driver?
- How to copy Blu-ray to DVD?
- Purchase and Upgrade DVD-Cloner
- How can I order DVD-Cloner online?
- How can I upgrade my DVD-Cloner Gold? Is it free?
- Upgrade DVD-Cloner to the latest version of DVD-Cloner Gold.
- I changed my Email address. Can I update my registration Email?
- How am I able to copy the program to a CD?
- Why do I need to upgrade my DVD-Cloner?
- Can I have a try before purchasing? What is the limitation of the trial version?
- I just order DVD-Cloner, but I can't find my code.
- How long can I receive my backup CD disc?
- How to upgrade can you tell me the link?
- I would also like to get a backup CD of the upgrade version, how can I get it?
- How can I upgrade my DVD-Cloner Platinum? Is it free?
- Upgrade DVD-Cloner to the latest version of DVD-Cloner Platinum.
- Do I need to pay when there is a new version?
- I have ordered the download version. Can I change to order a CD version?
- Can I order DVD-Cloner with a backup CD?
- Are there any differences among DVD-Cloner, DVD-Cloner Platinum and DVD-Cloner Gold?
- How much is DVD-Cloner, DVD-Cloner Platinum and DVD-Cloner Gold?
- How to switch to your local country?
- Troubleshooting for DVD-Cloner
- Why can't I download your software and get STOP when downloading?
- Does DVD-Cloner have a User Manual?
- How to check DVD-Cloner's version?
- What is a DVD-5 or DVD-9?
- How to change Express Interface to Expert Interface?
- ERR: skip bad sector
- Can I back up episode DVD movies?
- The burned disc cannot be read on a player, what should I do?
- Can I watch movies on my hard disk?
- Does DVD-Cloner support Vista 32-bit or Vista 64-bit?
- Can I make multiple copies of the same DVD?
- Can I copy the main movie only?
- Why does it tell me that the file I download is corrupt?
- How do I back up the original DVD movie onto my hard disk?
- Can I burn the DVD movie from the hard disk to a DVD+/-R (DL)?
- How long does it take for DVD-Cloner to copy a DVD?
- What kind of blank discs should I use?
- Can I copy TV show or TV series DVDs with DVD-Cloner?
- Can I copy my preferred sections rather than the whole DVD?
- Can I copy my preferred audio or subtitle?
- Why seeking the ripped MKV files failed under AMD GPU acceleration sometimes?
- Why does the ripped MKV file exceed 3GB when I set the output size to 3GB?
- Which Blu-ray copy protections can be removed by DVD-Cloner?
- Why is Internet needed when DVD-Cloner is working?
- Why is there a prompt "DVD-Cloner couldn't decrypt this Blu-ray movie now…"?
- How to burn video files into the DVD format?
- Install and Register DVD-Cloner
- I lost my code, how can I retrieve it?
- How to download and register the bonus softwares?
- How to install and register DVD-Cloner Platinum?
- How to register DVD-Cloner?
- Can I register on my off-line PC?
- I can't register and get the message: would you want to register on-line?
- I receive a DAT file but can't open it. (I received a message: would you want to register on-line and clicked on YES. What's going on?)
- What is the product ID? Do I need it?
- How to install and register DVD-Cloner Gold?
- Support service for DVD-Cloner
- Earlier Versions of DVD-Cloner
- About 64-bit
- Differences between the 32-bit versions and 64-bit versions of Windows Vista.
- Can 64-bit programs run on a 32-bit computer?
- The advantages of 64-bit.
- I have a 32-bit version of Windows Vista, and can I upgrade to the 64-bit version?
- Which versions of Windows operating systems are available in 64-bit format?
- What is 64-bit computing?
- About DVD
- DVD copy protection history
- The Available DVD Titles
- What's the difference between first, second, and third generation DVD?
- What's a hybrid DVD?
- DVD Capacity
- DVD Development History
- DVD General Knowledge
- The representation of the three letters DVD
- DVD Technology
- DVD-related Issues
- How to Identify Pirated DVDs
- DVD-R vs. DVD+R
- Why do a lot of new DVD releases now claim to be "Copy Protected"?
- DVD-9 and DVD-5
- Non-standardized DVD formats
- What is the difference between Blu-ray and DVD?
- About Blu-ray
- HD DVD vs. Blu-ray Disc Explained
- History of Blu-ray disc
- Comparison of high definition optical disc formats
- Blu-ray Disc Rot Problems?
- The video and audio codes that Blu-ray disc supports
- The speed of a Blu-ray disc reading or writing data
- Introduction to How Blu-ray Discs Work
- How Blu-ray Reads Data
- How a Blu-ray Disc Is Made
- About UHD Copy
- DVD-Cloner FAQ
- DVD-Cloner General FAQ
- Improvements in DVD-Cloner's user interface
- How much data can you fit on a Blu-ray disc?
- What video codecs will Blu-ray support?
- Will Blu-ray down-convert analog outputs?
- Why should I upgrade from DVD to Blu-ray?
- What is upconverting DVD player?
- What specifications govern BD discs?
- What is the BD-R/RE AV format?
- What are hybrid discs?
- What is IDT?
- Can I get the latest information of updates?
- What kind of formats do Blu-ray discs support?
- How many formats are there being developed for Blu-ray technology?
- DVD-Cloner supports the backup of Blu-ray movies.
- What's SmartAnalyzer?
- What's Smart Help Tech?
- What kinds of discs does DVD-Cloner support?
- What are DVD-Cloner's requirements for hard drives?
- What are the system requirements for DVD-Cloner?
- Does DVD-Cloner support external DVD burners
- How to install and uninstall DVD-Cloner on my PC?
- When is the live chat available? Under what circumstances do I use this live chat?
- What are the benefits of Blu-ray discs?
- What is HST?
- Which GPUs can work with HST?
- How to enable HST in DVD-Cloner?
- Why cannot I enable HST on my computer?
- What is OpenCloner Decode widget?
- DVD-Cloner Technical FAQ
- How to combine multiple DVD-9s to one BD-R/RE(DL)?
- It is annoying that the burned disc has subtitle on the screen when I play it.
- Is it possible to copy a PAL format disc and burn in NTSC format?
- After selecting " Run As An Administrator ", the software still doesn't run properly.
- Is DVD-Cloner compatible with my Macintosh?
- How to run DVD-Cloner as the administrator?
- Why can't TVISTO play the files copied by DVD-9 to DVD-9?
- When I try to view files on the DVD, it says that the disc format is raw, why?
- The burned disc goes through the FBI warning and the introduction of the production company and stop.
- How do I set up DVD-Cloner so that multiple users can login under a different user profile rather than as an administrator to use DVD-Cloner?
- I can't use DVD-Cloner under Administrator ID.
- Does DVD-Cloner copy my DVD that I can play on my PS3, PS4 or Xbox One console?
- I want to know whether DVD-Cloner can read region free discs.
- Get the error of "Failed to get IFO" when copying DVD.
- What should I do if I see ERR: skip bad sector?
- An error occurred when reading the disc.
- What do you mean by SPTI?
- What do you mean by ASPI?
- What do you mean by LIBC?
- Can I have the software record it straight to the target drive and not the hard drive?
- Why does the DVD player read burnt discs very slowly, very pixilated as if having a problem reading discs?
- The burned disc cannot be read on a player.
- The software wants to cancel burning in the middle of DVD burn.
- How to copy a DVD-5 movie?
- Does DVD-Cloner support the backup of DVDs with region codes? Can the copied DVD be played on DVD players?
- What's the difference between Express interface and Expert interface? Which interface should I use?
- How to combine two DVD-9s to one DVD+/-R DL?
- Can DVD-Cloner copy two DVD5s/DVD9s to one DVD9?
- Can DVD-Cloner remove the ARccOS protection? Does it have CPRx tech?
- Can DVD-Cloner remove region code, CSS and Macrovision protection?
- What improvements does DVD-Cloner make in its burn engine?
- How to combine several movie titles from two DVDs to one DVD+/-R DL?
- How to copy a DVD-9 movie?
- Why won't my copied DVD+/-RW disc play on the DVD drive, or DVD player?
- What kind of discs (DVD-R/RW or DVD+R/RW) should I use?
- I am unable to make a copy that works like the original DVD.
- How to combine several movie titles from multiple DVDs to one BD-R/RE(DL)?
- How can I burn a DVD movie?
- It asks for a blank disc to be inserted into dvd burner even if a blank disc is already in it.
- "file is too big for the disc, and do you still want to burn?".....when I click "yes" it just cancels the whole operation.
- I can't download DVD-Cloner from https://www.dvd-cloner.com/download.html, what shall I do?
- I have turned off all the security on my computer but when I click on the link to get the download of DVD-Cloner, all I get is: STOP this file is protected.
- I can't download your software and get STOP when downloading.
- How to create multi-language text for the DVD-Cloner interface
- What can I do when I encounter burn failed?
- How to rip UHD blu-ray to a HDR mkv file?
- DVD-Cloner Purchase and Upgrade FAQ
- Can I try the trial version before I buy it?
- How to order DVD-Cloner without a credit card?
- Is it safe to purchase your software online?
- Is it safe to pay for it by credit card?
- How to upgrade to the latest version of DVD-Cloner?
- How to upgrade DVD-Cloner Platinum?
- How to upgrade by paying the upgrading fee?
- What is the best way to upgrade to the latest version of DVD-Cloner Platinum or DVD-Cloner Gold?
- When I reinstall DVD-Cloner, it tells me that my code has expired.
- What does the expired date mean in my upgrading order confirmation Email?
- Is there a yearly fee for DVD-Cloner or is it a one-time purchase?
- I bought DVD-Cloner less than a year ago, and can I get free upgrade?
- I want the CD version of DVD-Cloner, where can I get it ?
- I haven't received DVD-Cloner after I bought it from TOPTEN.
- Does your trial version have any limitations?
- How can I buy DVD-Cloner? What payment methods does it support?
- How to upgrade DVD-Cloner?
- How can I make a CD version of DVD-Cloner Gold?
- How can I order the CD version from MyCommerce?
- How can I change to the CD version from the download version of DVD-Cloner I ordered?
- How can I make a CD version of DVD-Cloner?
- How can I make a CD version of DVD-Cloner Platinum?
- I have ordered the CD version of DVD-Cloner. How soon will I receive it?
- I haven't received DVD-Cloner after I bought it from SWREG.
- I haven't received DVD-Cloner after I bought it from MyCommerce.
- DVD-Cloner Register FAQ
- DVD-Cloner’s Bonus Software FAQ
- What are the features of Netflix Video Downloader?
- How can I get and register the bonus software?
- How can I get the manual code to register offline?
- How can I get and register the bonus software Netflix Video Downloader?
- What can the bonus software Netflix Video Downloader do?
- I cannot start the second instance.
- How can I find serial NO?
- How can I get and register Netflix Video Downloader?
- DVD-Cloner Platinum FAQ
- DVD-Cloner General FAQ
- Blue-Cloner FAQ
- Which Blu-ray copy protections can be removed by Blue-Cloner?
- Why is Internet needed when Blue-Cloner is removing protections?
- Why is there a prompt "Blue-Cloner couldn't decrypt this Blu-ray movie now…"?
- Can the Cinavia protection be removed by Blue-Cloner?
- Why do I get such a prompt "This is an invalid disc…" when playing a copied Blu-ray movie?
- Why do I get such a prompt "Wrong Region Code" when playing a copied Blu-ray movie?
- How to copy 3D Blu-ray movies?
- What can i do when Blu-ray copy failed?
- What is the upgrade policy of Blue-Cloner?
- How to register Blue-Cloner?
- What is the limitation of the trial version of Blue-Cloner?
- How to enable HST in Blue-Cloner?
- About DVD Copy
- Choosing DVD Copy Software (copy DVD Movie Software)
- Copy DVD movies under Windows Vista
- How to copy DVDs with DVD-Cloner
- How to Copy a DVD Movie?
- Copy a DVD
- How to make DVD copy?
- Illegal and Legal DVD Copy
- Find out Why This Software is So Popular
- DVD copy protection strengthened
- A Basic Guide: DVD Copy Rules
- How to Copy a DVD to your iPad cellphone other mobile devices?
- DVD-Cloner for Mac FAQ
- DVD-Cloner for Mac General FAQ
- What's DVD-Cloner for Mac?
- How to install and uninstall DVD-Cloner for Mac on my PC?
- Does DVD-Cloner for Mac support external DVD burners?
- What are the system requirements for DVD-Cloner for Mac?
- What are DVD-Cloner for Mac's requirements for hard drives?
- What kinds of discs does DVD-Cloner for Mac support?
- What's the interface of DVD-Cloner for Mac like?
- What's the video quality of the DVDs copied by DVD-Cloner for Mac?
- What're the features of DVD-Cloner for Mac?
- How to use DVD-Cloner for Mac to convert DVD/Blu-Ray movies to MKV file?
- What's new in DVD-Cloner for Mac?
- Can I try the latest version first? What's the limitation of the free trial version?
- How to copy 4K UHD DVD movie on Mac OS X?
- DVD-Cloner for Mac Technical Questions
- DVD-Cloner for Mac can copy the backup DVD movie.
- Input and output file formats DVD-Cloner for Mac supports
- The function of "Burn method" in the "Advanced Setup" window
- Burn the DVD movie from the hard disk to a DVD+/-R
- How to copy a DVD movie on Mac?
- What kind of blank discs should I use for DVD-Cloner for Mac?
- How long does it take for DVD-Cloner for Mac to copy a DVD?
- Can the copied DVD be played on DVD players?
- Is there movie menu in the copied DVD under "Split one DVD-9 to two DVD-5s" copy mode?
- How to combine two DVD-9s to one DVD with DVD-Cloner for Mac?
- Is DVD-Cloner for Mac able to copy two DVD-5s/DVD-9s to one DVD-9?
- Is DVD-Cloner for Mac able to remove ARccOS protection?
- Is DVD-Cloner for Mac able to remove region code, CSS and Macrovision protection?
- What are the advantages of DVD-Cloner for Mac compared with other DVD copy software for Mac?
- Why does the "Open device failed" window appear during the copy process?
- Purchase & Register & Upgrade
- How can you help me solve the problems about DVD-Cloner for Mac?
- Is there a trial version of DVD-Cloner for Mac which can be tried before buying?
- How to purchase DVD-Cloner for Mac?
- Could you help me to retrieve my lost registration code?
- The upgrade policy of DVD-Cloner for Mac
- How to register DVD-Cloner for Mac?
- Order the CD version of DVD-Cloner for Mac
- Why didn't your upgrade system recognize my code of DVD-Cloner for Mac?
- Is the "one year upgrade" only good for one year?
- Am I eligible for the latest version? How do I get a free upgrade?
- How to find my registration code?
- How much is the upgrade?
- About DVD copy for Mac
- DVD-Cloner for Mac General FAQ
- OpenCloner Ripper FAQ
- How to remove DRM from iTunes movies?
- How to quickly Rip an encrypted DVD movie to a mp4 file?
- How to enable graphics adapter acceleration when transcoding?
- How to transcode a 4K video file to be uploaded to Youtube?
- How to convert a 4K UHD Blu-ray movie to a high quality MP4 file?
- How to use VLC Media Player to play Blu-ray or 4K UHD disc?
- How to choose a DVD/Blu-ray/iTunes movie ripping software?
- How to Clear Up Blurry Videos? [Video Guide]
- How to use VLC to play encrypted Blu-ray discs? [Video Guide]
- How to rip Blu-ray UHD to MP4 files?
- How to convert encrypted iTunes M4V movies to MP4 video files?
- Solution for OpenCloner Ripper convert iTunes videos with audio only?
- Open PassDCP FAQs
- How to bypass or strip HDCP without buying an HDMI splitter to remove HDCP?
- How to use Open PassDCP to strip HDCP?
- How to record 4K UHD streaming hit movies and tv shows without PC required?
- Why does the TV display a black screen when I try to use a video capture card to record the video output from the Roku or the Blu-ray disc player?
- How to remove the HDCP protection of a video capture card?
- OpenCloner Affiliate Program
- What are the advantages of OpenCloner Affiliate Program?
- How to join OpenCloner Affiliate Program?
- How long is the cookie lifetime set by OpenCloner for the affiliate program?
- What commission do I get from OpenCloner affiliate program?
- Why are the products’ name slightly different on DVD-Cloner.com and on 2Checkout platform?
- What discounts can I offer shoppers?
- What should I do if a customer contact me?
- DVD-Cloner Knowledge Base
- OpenCloner Ripper FAQ
- How to transcode a 4K video file to be uploaded to Youtube?
How to transcode a 4K video file to be uploaded to Youtube?
If you want to share your 1080p video on youtube in 4K format, then you need the format conversion software to transcode first. It is recommended to use OpenClonerRipper software to easily implement 4K transcoding.
1. Prepare software
OpenCloner Ripper software (Download OpenCloner Ripper) is a DVD ripping software and a transcoding software. It can convert a wide variety of videos into MP4 files in H264/H265 format. First download and install this software, we will use this software as an example to explain how to transcode.
2. Analyze the source video and determine which parameters to modify.
First of all, before the start of transcoding, we have to know the encoding format of our source video file, and know what our target encoding format is. We can view the source video encoding information through MediaInfo software. Below is an example:
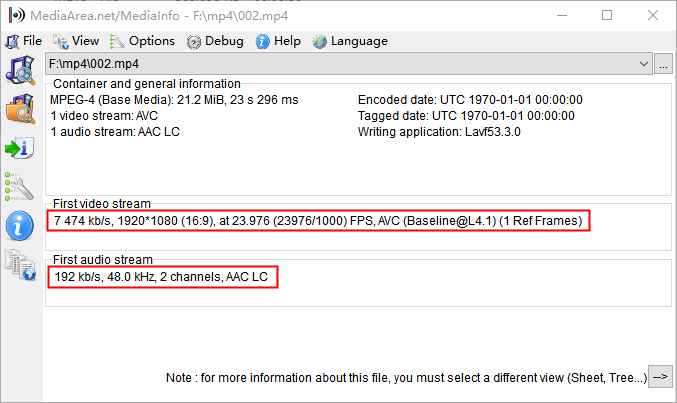
Note the information in the red circle, our source video file format is: video: AVC (H264) codec, 1080p@23.976fps, 4747kbps audio: AAC codec, 48KHZ, 192KBps.
By consulting Youtube, we know that the 4K encoding information recommended by Youtube video is: Video: AVC (H264), Audio: AAC.
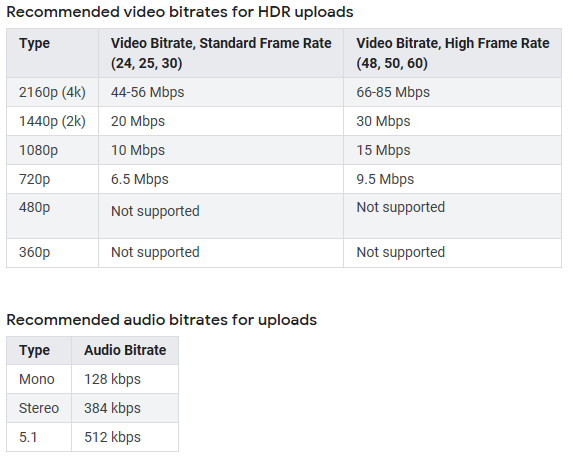
By comparison, we need to modify the video resolution to 4K (3840x2160), modify the frame rate to 30, and increase the bit rate. In addition, by previewing the source video, we found that the video content is clear, there is no noise, and no need to add filters to deal with. Audio coding does not need to be modified, but the bit rate needs to be increased to 384Kbps.
So we have determined what we need to modify:
-
Modify the resolution to 4K (3840x2160).
-
Modify the frame rate to 30.
-
The code rate is modified to 45Mbps.
-
The audio code rate is modified to 384kbps.
3. Start OpenCloner Ripper and start transcoding
Start the installed OpenCloner Ripper software, then open the source video file. After opening the file successfully, you will see the following figure:
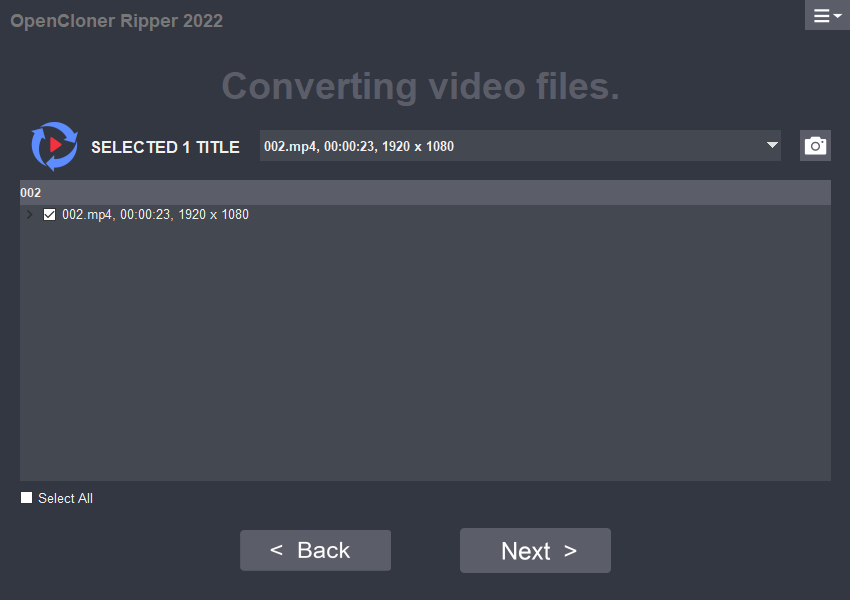
This window is mainly used for custom audio and subtitle tracks. Since our source video has only 1 track and no subtitles, we don't need to make any changes. Just click "Next" to continue.
4. Modify the encoding parameters
In this window, we first need to select a preset profile close to our encoding settings. Click the red button in the figure to select the general->Fast 2160p30.
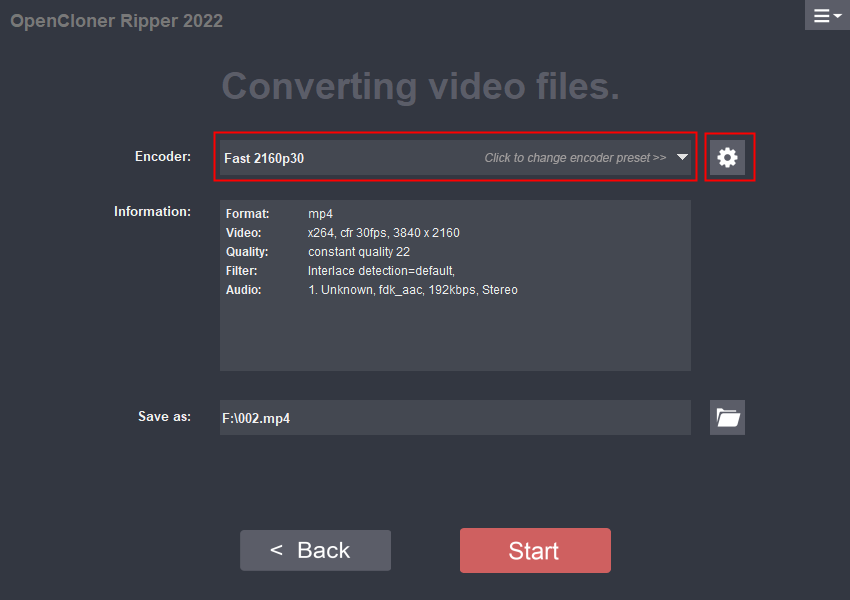
By observing the information in the window above, we found that we need to adjust some parameters to suit our needs. Now click the "setup" button in the second red box to open the Edit encoder window.
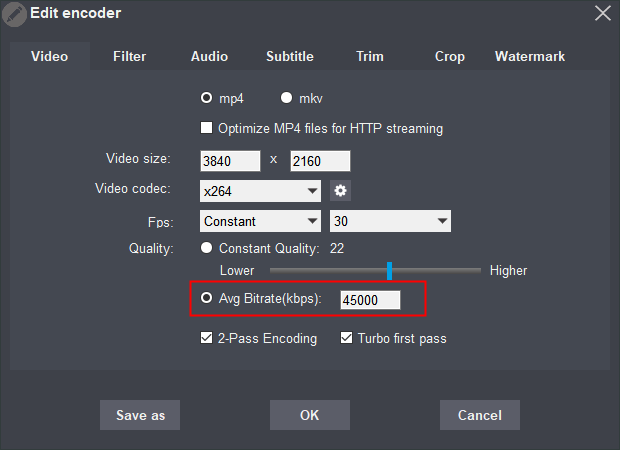
First we need to adjust the rate control method to "Avg bitrate" and enter the code rate of 45000, as shown above. Then switch to the Audio tab and make the Audio settings.
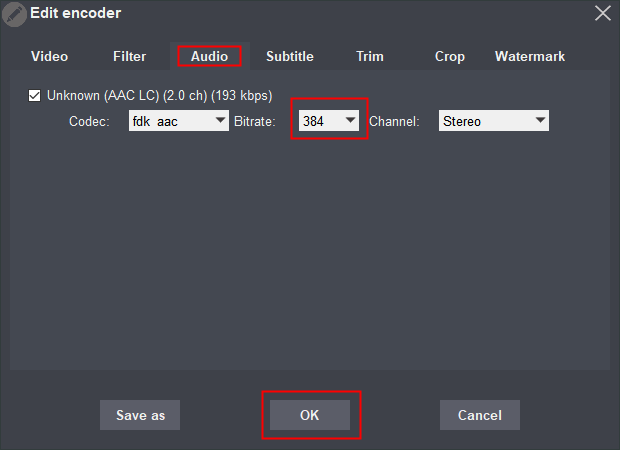
In the Audio settings we only need to modify the bit rate to 384kbps, as shown above. After the modification is completed, click OK to close the window. We have modified all the parameters we need.
And then, in the information window again, confirm that our settings are correct.
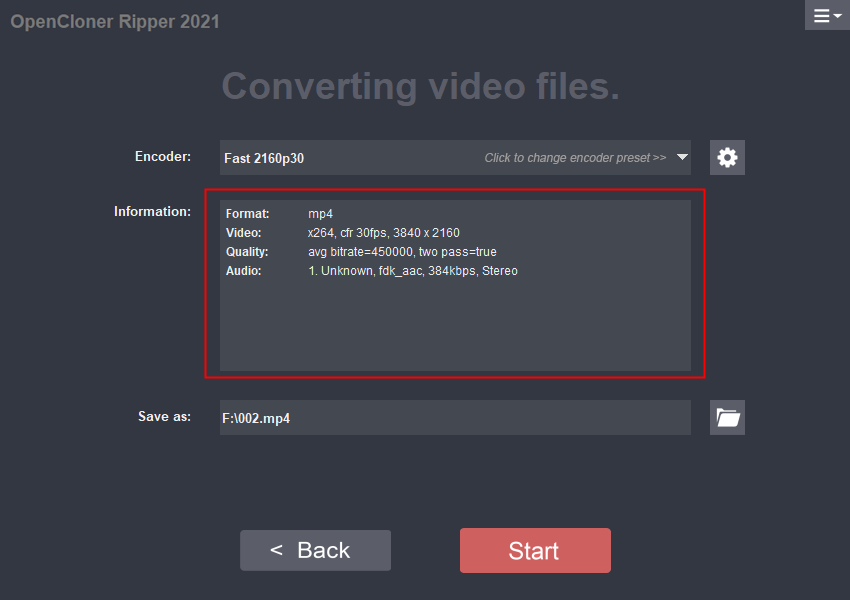
Finally click "Start" to start transcoding.
5. Wait for the transcoding task to done
After OpenCloner Ripper starts transcoding, we don't need to do anything, just wait patiently.
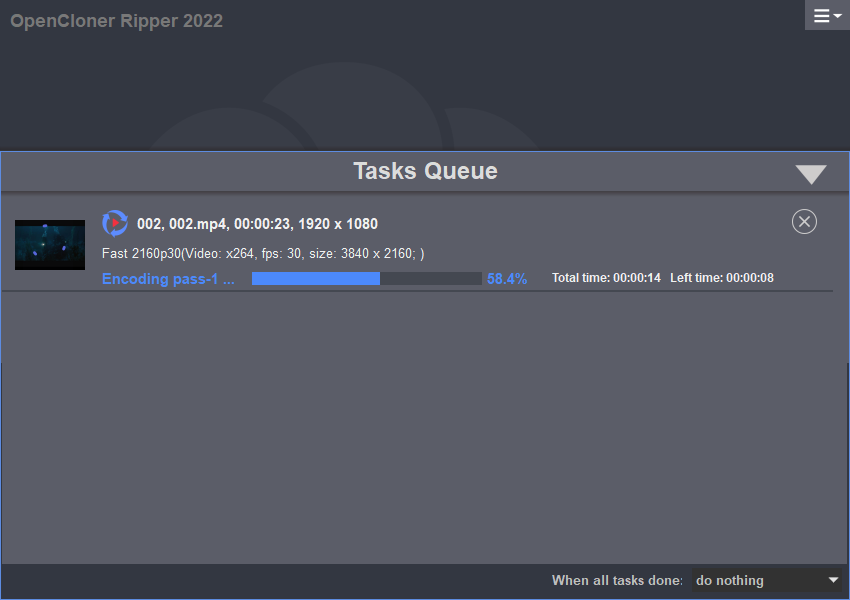

At this point, our transcoding work is complete.
Updated : 2023-08-11.